cassiopeia-template-customisation
Introduction
Cassiopeia is the site template supplied with Joomla 4. It is an excellent general purpose accessible and responsive template. It can be customised via the template options and the user.css file by users with a little knowledge of HTML and CSS.
The following illustration shows the appearance of a Joomla 4 site with one article and a few menu items created.

Templates: Edit Style
You can experiment with the site appearance by opening the Edit Style form. Go to System → Templates → Site Template Styles and select the template title in the Style column, Cassiopeia - Default. The Advanced tab contains settings you can adjust:
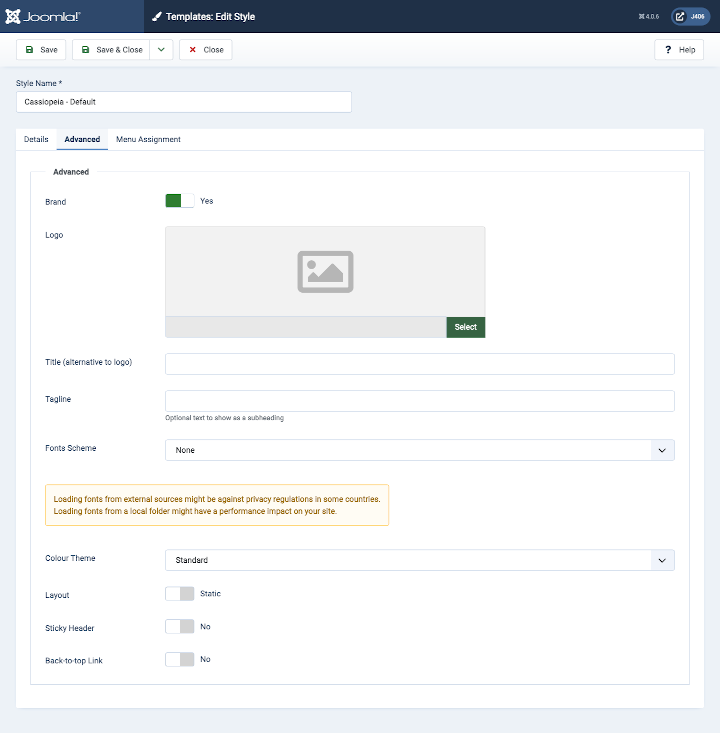
To try the options have one browser tab or window open with the Administrator interface and a second tab or window with the Site interface and switch back and forth after each saved change.
Brand
- Yes the default. The Cassiopeia logo bar containing a Logo or Brand name is displayed with a dark background, blue by default.
- No The logo bar is not displayed. The options to select a Logo, Title and Tagline disappear.
The default brand image is the word Cassiopeia as an image in an SVG file. That is what is displayed in the first illustration above.
You might set the Brand to No if you wish to provide branding in a custom HTML module.
Logo
- None The default Cassiopeia image logo will be used unless a Title is defined.
- Logo Image The selected Logo will appear in place of the Cassiopeia logo even if a Title is defined.
Title (alternative to logo)
- My Brand Name If present and you have not selected a Logo image, the words in the Title field will appear but underlined in the blue top bar.
Tag Line
- Always at your service If present the words in the tag-line field will appear in a small font size beneath the logo image or Brand name.

Fonts Scheme
- None the default. The font family specified in the template style sheet is used, which usually means the site will use the fonts you are familiar with available on your own computer.
- Others A font family located in the template folder hierarchy or downloaded from the web will be used. You can see the changed appearance of the text on a page when you reload the site after changing this option.
Color Theme
- Standard A dark blue background color for the Brand bar and other features such as the Login button.
- Alternative A maroon background color instead of dark blue.

Layout
- Static the default. The maximum width is set to 1320px. On wider screens the margin just gets wider.
- Fluid There is no maximum width.
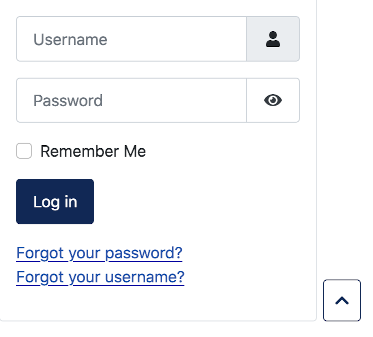
The view on a narrow screen mobile device:

Sticky Header
- No the default. Header items and content scroll upwards out of the viewport.
- Yes Except on narrow screens, header items remain fixed to the top of the viewport while the content items scroll upwards. That is only evident where page content is taller than the viewport.
Back-to-top Link
- No the default. There is no Back-to-top link.
- Yes Where content is taller than the viewport, at the bottom right of the page is a button marked with an Up chevron. Select it to scroll back to the top of the page.
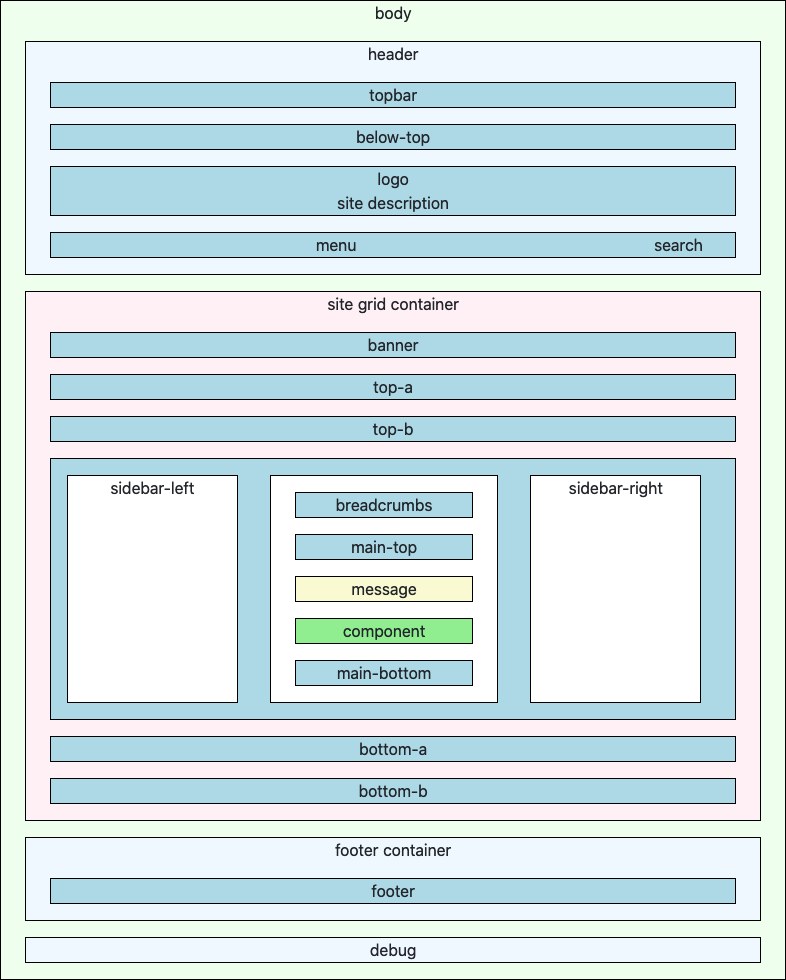
Cassiopeia Template Positions
As you build a site with Cassiopeia it becomes really useful to know the locations of the positions you can use for modules. Some are descriptive, like menu and bottom-a but it is not so obvious where they are until you use them. This illustration should help:
Try the following:
Move the Menu Module to the menu Position
A newly installed Joomla 4 site has a menu in the sidebar-right position, seen in the first illustration above. For this tutorial some menu items have been added, one of which is a parent with two child items. To move this menu to the menu position go to Content → Site Modules in the Administrator menu. In the list there are three modules including Main Menu. Select it to open the Modules: Menu edit form.
In the Module tab, change the Position field at the right to Menu [menu]. Save and have a look at the result in the Site display. The menu looks fine but the child items are not there.
In the menu edit form select the Advanced tab and scroll down to the Layout field. It is a drop-down list with four options. --From Module-- / Default is selected by default. Try the other options and view the result. (Remember to Save in the edit form and reload in the Site view.) Neither of the --From Module-- options show the child menu items but both of the --From Cassiopeia Template-- do.
So what difference does Collapsible make?
- Collapsible Dropdown: On narrow screen mobile devices the menu collapses to a Hamburger icon until selected. On selection it expands to show a vertical list.
- Dropdown: The menu always appears as a vertical list.
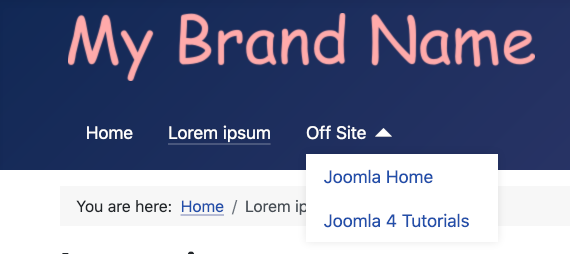
Move the Menu Module to the topbar Position
In the edit form Module tab set the Position to Top Bar [topbar] and have a look at the result. There is a snag - the menu is positioned further to the left than when it was in the menu position. That is because menu position and logo location have a CSS class of grid-child but the topbar does not. That can be fixed with an entry in the user.css file, coming below.
Customise Cassiopeia
What if you do not care for the dark blue header background colour? Suppose you would prefer a dark green theme. To fix that you need a little knowledge of CSS. Go to System → Site Templates → Cassiopeia Details and Files to open the Template: Customise (Cassiopeia) form.
The illustration below shows two folder groups. The first group consists of the template folders and files that you should not change but you may add to. In particular you may add template override HTML files to the html folder, The second group contains the template media files that you should not change. However, you may add a user.css file to the css folder and/or a user.js file to the js folder. You would do this if you wanted to make a few simple changes to site appearance.
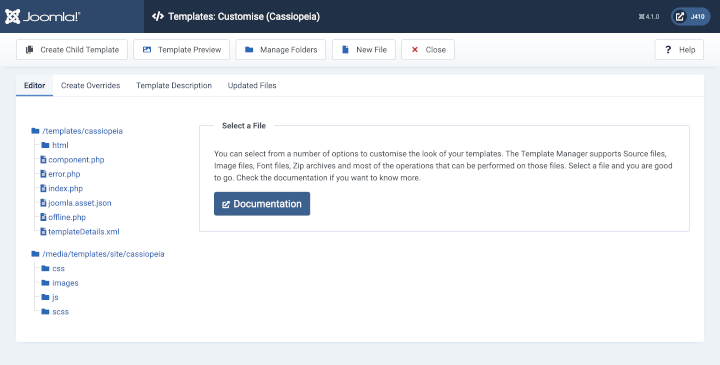
Note that there is no user.css file present in the css folder. That is one you create yourself so that you can override previously defined styles. If it is not present, create it now by selecting the the css folder and then the New button. In the New File modal dialog select the css folder otherwise the new file will appear in the wrong place. Enter user (lower case and without .css) in the File Name field and select .css from the File Type field. Select the Create button to create the file. If user.css is already present, select it to open the edit form.
Headings
As a simple starter, change the colour of headings to dark green. Headings are tags in the range h1, h2, h3, h4, h5 and h6. In the user.css file enter the style definition:
h1, h2, h3, h4, h5, h6 {
  color: darkgreen;
}
Save and reload the site to see the result. The Page or Article title should be dark green. If not, check what you have typed. The formal language for Joomla documentation is British English, so colour rather than color as in American English. But in CSS it must be color. Is the punctuation correct?
Not so obvious is that some tags other than headings may be styled to look like headings. So add this:
.h1, .h2, .h3, .h4, .h5, .h6 {
  color: darkgreen;
}
Note here that the leading dot (.) is a class selector, for example Dummy H1 - so there is a dot in the CSS file but not in the class name.
Header Background
In the browser tab containing the Site, open your browser Developer Tools, Firefox in this example, and select the header tag.
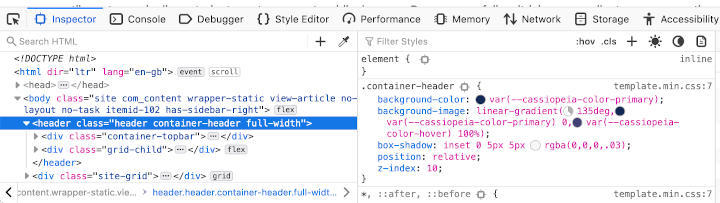
That shows the styles used. The container-header style is where the background-color and background-image are set. They need to overriden in the user.css file. Try this:
.container-header {
  background-color: darkgreen;
  background-image: none;
}
topbar Style
Remember that comment about the menu being too far to the left in the topbar? That is because it does not have a maximum width and appropriate margins set. Put this in user.css file to fix that:
.container-topbar {
  max-width: 1320px;
  margin-left: auto;
  margin-right: auto;
}
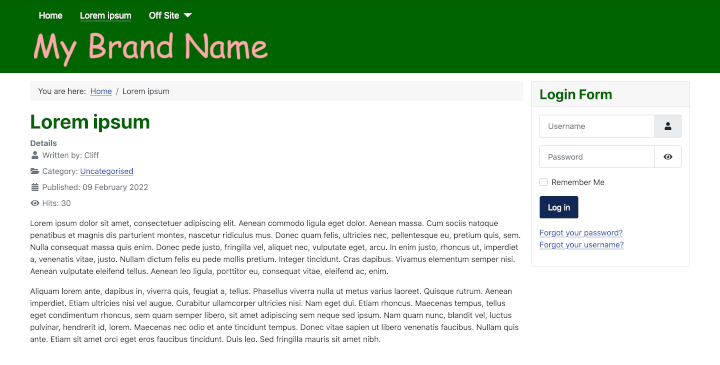
This is the working green theme:
Accessibility
Note that there must be a sufficient contrast between background and foreground colours to meet web accessibility standards. You can check your contrast at the
WebAIM Contrast Checker. Dark green is \#006400.Overrides
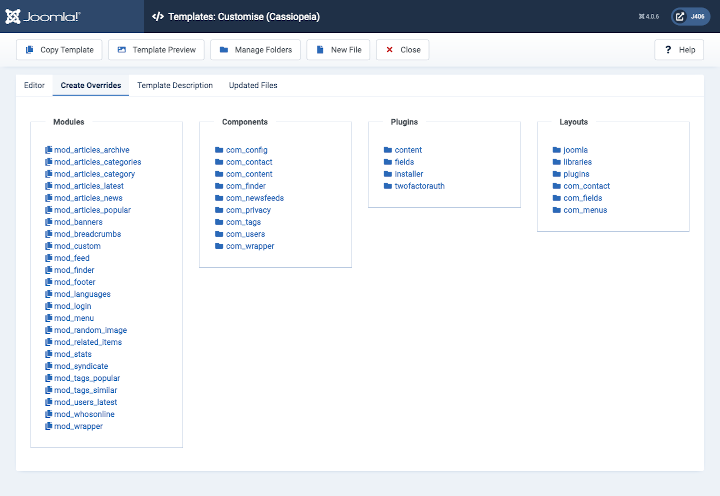
The Templates: Customise (Cassiopeia) form Create Overrides tab shows the list of extensions for which you can create an override. Note the different symbols: select a folder symbol to show a list of the folders and files it contains; select a multi-file symbol to immediately create an override for that extension; the created item disappears from the list - select the Editor tab and locate the created override in the html folder. There may be more than one file created - the created files are copied from the original extension ready for you to edit. For that you need to know some HTML and PHP!
This is the Create Overrides tab:
If you are just experimenting and do not really want an override, you can Close the edit form, Select the Manage Folders button in the Toolbar and select the Delete button at the bottom of the Manage Folders modal form.
Overrides are really about customising extensions rather the Cassiopeia template and that is another story.
Child Templates
If you want to make more substantial changes to site appearance you could create a child template. That copies just a small selection of folders and files for you to change or add to but otherwise continues to use the parent template folders and files. By using child templates you could have some pages with one theme colour and other pages with a second theme colour. Child templates are covered elsewhere. This is an illustration of the file structure in a child of Cassiopeia:

Further Information
- Template Basics
- Cassiopeia Template Folders and Files
- Template Overrides
- Template Layouts
- Cassiopeia Template Simplified - A Case Study - a simple template based on Cassiopeia