developer-eclipse-pdt
Introduction
As a PHP Developer you will need some tools to help you in your work. Eclipse is an IDE (Integrated Development Environment) that can be used for all sorts of projects in all sorts of programming languages. Eclipse PDT (PHP Developer Tools) includes the extensions needed for PHP development. Some of the features mentioned in its Home page include:
- Syntax Highlighting
- Syntax Validation
- Content Assist
- Code Navigation
- PHP Debugging (Zend Debugger / Xdebug)
- PHP Profiling (Zend Debugger / Xdebug)
Add to that the ability to copy files to where they need to be in your local test web site and build a zip file, there is enough to work with for years. Learning how to use Eclipse PDT takes time, a day or so, but it pays off. There are other IDEs and Code editors available!
Alternatives
IDEs have all of the bells and whistles needed to build PHP projects. Cross-platform examples known to be used by some Joomla developers include:
- JetBrains PhpStorm Commercial, Cross Platform.
- Apache NetBeans Free, Open Source, Cross Platform.
PHP Editors are good for editing code but lack some of the bells and whistles needed for big projects. Examples include:
- Visual Studio Code Free, Cross Platform.
- Notepad++ Free, Windows only.
Install Eclipse PDT
Go to the Eclipse PDT web site and download the version available for your platform (Linux, Mac or Windows):
https://www.eclipse.org/pdt/Follow the installation instructions for your platform.
The Eclipse Workspace
There are at least three different places where your project code will be located:
- Project source files are those you create and edit yourself. They should not be in your web tree. They should be in your personal file space. Examples: /Users/username/git (Mac) /home/username/git (Linux) ... (Windows). Each project will be in a separate sub-folder.
- Web tree location depends on your software stack installation. You can use your own file space. Examples: /Users/username/Sites/j4test (Mac), /home/username/public_html/j4test (Linux), ... (Windows).
- Eclipse Workspace is where Eclipse stores information about individual projects. The standard location is the root of your own file space. Examples: /Users/username/eclipse-workspace (Mac), /home/username/eclipse-workspace (Linux), ... (Windows). Each project should be in a separate sub-folder.
Ready to start Eclipse?
Start Eclipse
After start up you will be asked to confirm various settings. At some stage you will be asked to choose a workspace. The default is /home/username/eclipse-workspace but you want to create a sub-folder for each project so select the Browse button and then the New folder button. In the example below I have created a j4tutorials folder.

Select the Launch button. If anything is amiss you can select File / Switch Workspace at a later stage and do it again. You can delete unused workspaces later too.
On first start up you are presented with a Welcome screen. You can also go to this screen from the Help / Welcome menu items.
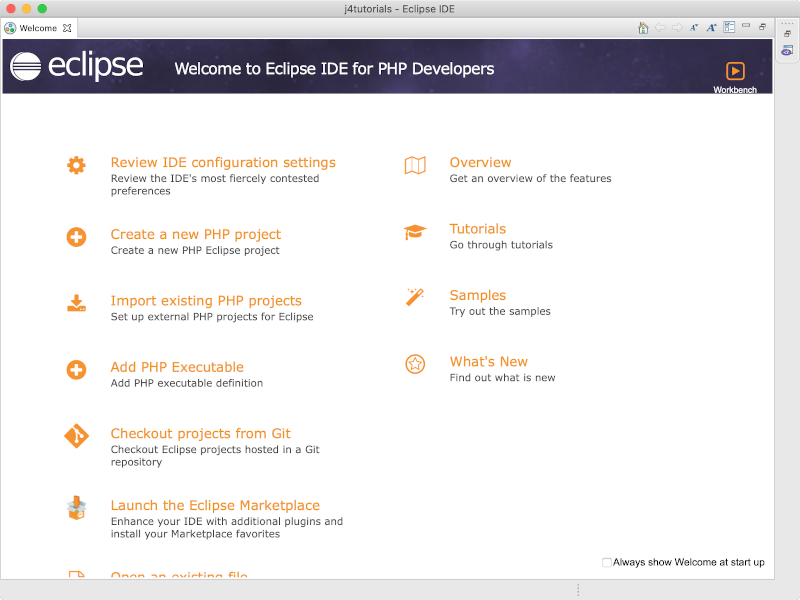
Start with Review IDE Configuration Settings. You can Tick or Cross any that seem appropriate, or Untick or Uncross or move on if unsure. You can also change settings again later.
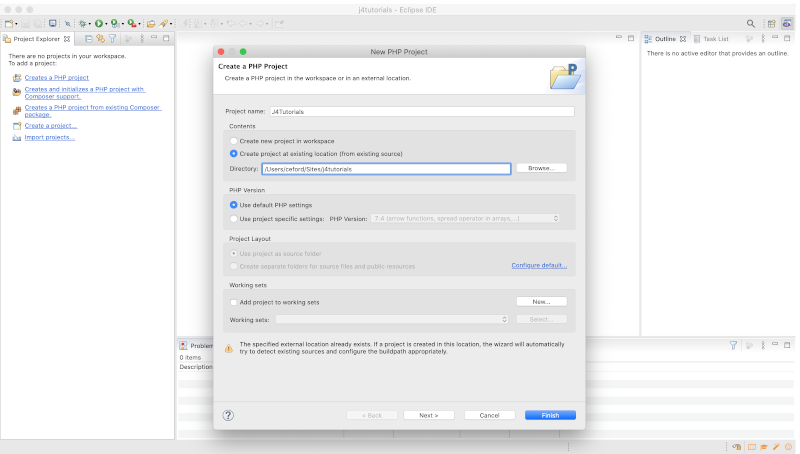
Create a new PHP Project
The first project to add is the test web site code. You will need this to check that your own files are being copied into the correct places and for debugging later. Select the item in the Welcome screen. If you have moved on to the Eclipse workbench select Creates a PHP Project from the Project Explorer. In the New PHP Project form:
- Enter a suitable Project Name. It should be a short word that will appear in the Project Explorer.
- Select the Create project at existing location (from existing source) radio button.
- Browse to the location of your Joomla test web site and select it.
- Select Finish.
Your web site files will be added to the Project Explorer. It may take a minute or two for Eclipse to finish this process as it does some preparation behind the scenes. You can select the Project to expand the first folder level.
Two files will be added to your site folder: .buildpath and .project. As they start with a period(.) you may not see them and do not need to worry about them. They are xml files containing information used by Eclipse.
The PHP Perspective
The collection of panels in the Eclipse screen is known as a perspective. The two most commonly used are the PHP Perspective nd the Debug Perspective. You can switch between them using the icons at the top right of the Toolbar. You can also use the menu: Window / Perspective / Open Perspective / PHP or Debug.
The following illustrations shows the PHP Perspective with a couple of edit forms open
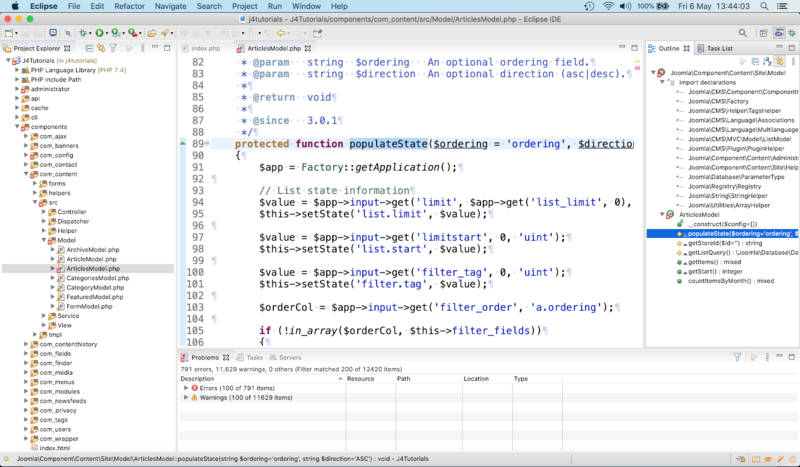
The Eclipse panels:
- The left panel is the Project Explorer where you can navigate your file structure.
- The upper centre panel is where open text editors appear.
- The upper right panel normally shows an outline of the selected edit panel. It can show other information.
- The lower right panel shows any one of a number of Views, selectable from the Window / Show View menu.
The Problems view says Errors (100 of 791 items) and Warnings (100 of 11629). This seems a lot but nothing to worry about.
A new Hello Universe PHP Project
You are now ready to create a new PHP Project for the extension you intend to develop. For illustration you can start with a simple component named com_hellouniverse. For me, the Hello Universe code will be located in /Users/username/git/j4xtutorials-com-hellouniverse and I will use j4xtutorials as my namespace affiliation (the first word in the component name space).
In the Eclipse menu, select File / New / PHP Project. The form is the one illustrated above. My data:
- Project name: HelloUniverse
- Contents: select Create project at existing location (from existing source).
- Browse: Navigate to /Home/username/git and select the New Folder button.
- In the New Folder dialog enter j4xtutorials-com-hellouniverse and press Create.
- With that empty folder open, select Open.
- The selected directory should say: /Users/username/git/j4xtutorials-com-hellouniverse
- Select Finish.
You will now see the new project in the Project Explorer along with your web site project. The new project contains two items, both related to PHP support. There are some hidden items used by Eclipse: .settings (folder), .buildpath and .project.
Add com_hellouniverse Folder
With the HelloUniverse project selected:
- Select the File menu item or right click on the project name.
- Select the New / Folder menu items.
- In the New Folder form enter com_hellouniverse in the Folder name: field.
- Select Finish.
The com_hellouniverse folder is where your extension code will go. Anything inside that folder will end up in a zip file that you can use to install in Joomla. Anything not inside that folder is used for other purposes. Two common files at this level:
- README.md is a Markdown formatted text file that describes the component. Such files are commonly used in conjunction with remote code storage, such as on Github (more on that elsewhere).
- build.xml is a file that contains instructions on what to do after you have made code changes. Most commonly, you will wish to copy changed files to the correct places in your web site tree and regenerate the zip file. Then, for most changes you can just reload the web page you are working on. You do not have to re-install the component. This is an enormous time-saver!
Add admin, site and media folders
- Select the com_hellouniverse folder and use the File / New / Folder menu items to create a new folder named admin.
- Again, this time create a new folder named media. BEWARE: make sure the parent is com_hellouniverse and not HelloUniverse.
- Again, this time create a new folder named site. If created in the wrong place it can be dragged to the correct place.
build.xml
The following code contains an exmple build.xml file to go in the root of your HelloUniverse project.
Some explanations:
- srcdir is the file system location of your source code, where files are copied from.
- sitedir is the file system location of your test site, where files are copied to.
- zipsdir is a location for the zip file - I find it convenient to keep project zip files from different projects together in a zips folder.
- Filesets are source groups to be copied to different destinations. means all folders and files.
- Targets are the destinations and what needs to be copied there.
Create a build.xml file containing the code above:
- Select File / New / XML File from the Eclipse menu.
- Make sure HelloUniverse is selected as the parent and enter the name build.xml (exactly that).
- Select Finish
- In the Source View (choose at bottom left) copy and past the code above in place of the one line already there.
- Save.
To make this work you need a build tool: Phing.
Phing
Go to the Phing website:
https://www.phing.info/ and download the Phar archive. You can use this direct link:https://www.phing.info/get/phing-latest.phar. Save the file in a phing folder in your personal bin folder /Users/username/bin/phing. Change the file permissions to 755 so that it can be run from the command line. To test, open a terminal, change to your bin/phing folder and enter ./phing-latest.phar -v to see the version number. Remember the full path to the file:- /Users/username/bin/phing/phing-latest.phar
You will need it later.
Eclipse Preferences - Builders
This is where you configure Phing to build your project whenever you make code changes.
- In Project Explorer, Select the HelloUniverse project.
- Select the File / Properties menu items.
- In the Properties dialog, select Builders and then the New button.
- From the Configuration Type dialog select Program and then OK
- in the Edit launch configuration properties dialog enter a suitable title: Build HelloUniverse.
- in the Location field enter the path to the phing program or use the Browse File System button to search for it: /Users/ceford/bin/phing/phing-latest.phar
- For the Working directory field, select the Browse workspace button and then select HelloUniverse.
- Click OK, then Apply and Close.
To test: select the Project / Build Project menu items. The Console view at the bottom of the screen will show the progress of the build. At this stage it is likely to show BUILD FAILED in red. That is expected - the component folders will be created on installation of the zip file. It does not exist yet because there is no code. But it shows that the Phing build tool is working.
How to Debug
When something goes wrong you may want to step through the code line by line to see what is actually happening. If you have set Debug System to Yes and Error Reporting to Maximum in Joomla Global Configuration you may have a stack trace to show where an error is occurring in the code. Or you may be seeing something unusual in the output and have a good idea where the fault may be. In either case you need to set breakpoints where execution will pause to allow you to see the values of variables and to progress through the code line by line.
Set a Breakpoint
Breakpoints have to be set in the web site project, J4Tutorials. As an example, in the Project Explorer panel, expand the J4Tutorials project and find administrator / components / com_users / src / Model and double click UsersModel.php to open it in an Edit window. Go to line 87 and double click on the number 87. A small blue marker appears to indicate a breakpoint has been set. The code execution should stop here when you view the list of Users via the Administrator / Users / Manage menu items.
Create a Debug Configuration
From the top menu select Run / Debug Configurations. In the form enter a recognisable title, for example Debug Admin, to select later from a drop-down list. Make sure the file selected is /J4Tutorials/administrator/index.php. In the form Common panel select Debug from the Display in favorites menu list. Check that Debugger is set to Xdebug. Select Apply and Close.
You can now select Debug Admin from the Toolbar debug drop-down list, the bug symbol icon.

Debug icons, hover for labels:
- Skip All Breakpoints A toggle to skip breakpoints except the first line of index.php.
- Resume Continue normal execution up to the next breakpoint.
- Terminate Stop debugging (but you also need to remove the Xdebug cookie).
- Step Into On a line containing a function call, step into that function.
- Step Over On a line containing a function call, do not enter that function.
- Step Out Of In a function, skip stopping at each line and return to the caller.
Debug Procedure
On starting a debug session, execution pauses at the first line of administrator/index.php. That is the Home Dashboard page. You need to select the Resume symbol (yellow bar and green right triangle). After a delay of a second or so there is more activity and more paused Remote launches in the left Debug Admin panel. This is the Home page using ajax to fetch update information. Just keep clicking Resume until activity has stopped. Then in your browser, select the Users item from the Home Dashboard. Eclipse springs to life and stops execution at the breakpoint you set.
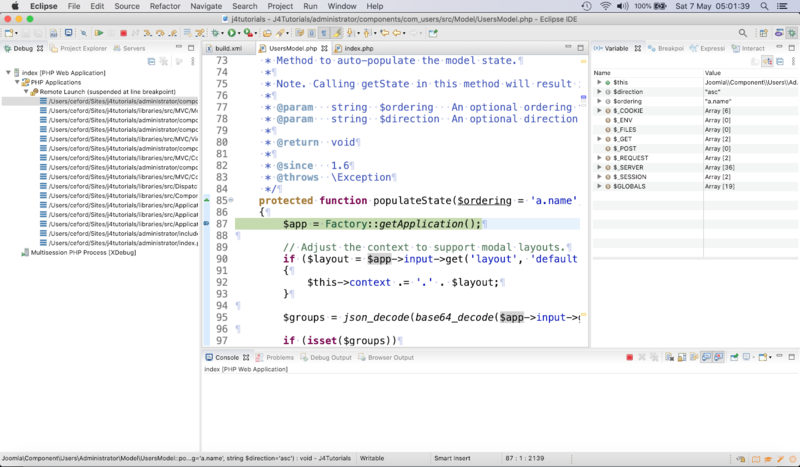
Features to note:
- The current line of code is marked with a pale green background.
- The left panel shows a stack trace - the previous function calls that led to the current function. Select any item to see parent code.
- The right panel can show either active variables or breakpoints. Expand objects as required to see detail.
Some problems
- Failing to stop at breakpoints: This happens if you open another PHP
program such as phpMyAdmin. To fix:
- Go to Run / Debug Configurations and select your Debug Admin item.
- In the Debugger tab select Configure...
- In Path Mapping select and Remove any path not related to your test web site.
- Select Finish - you may need to Terminate and reload the debug session.
- Debugging resumes after a selecting the Terminate button. To Fix:
- Use your browser Developer Tools to open an inspection window.
- Find the cookies your browser is using (Storage in Firefox)
- Select and delete the XDebug cookie.
Using Git
Git is a version control system widely used for managing any sort of text, mostly code but it can be anything. It works from a command line but is usually invoked by graphical tools such as Eclipse. If you would like to read about git see the web site:
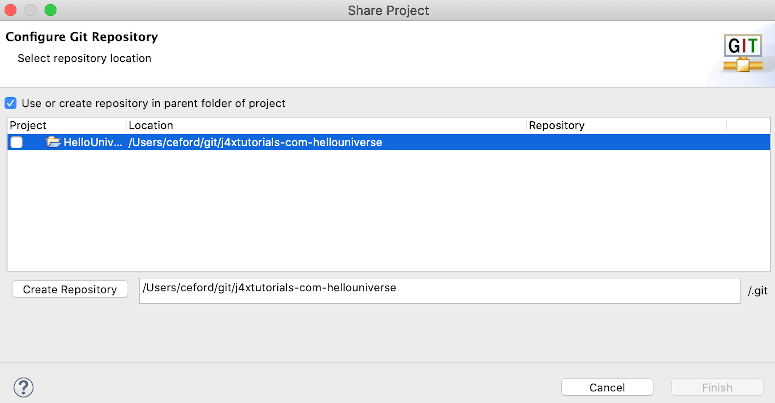
https://git-scm.com/If you want to use git you need to install it for your platform. Then in Eclipse, select your HelloUniverse project, right click and select Team / Share Project. In the Share Project dialog select the Use or create repository in the parent folder of project and select the HelloUniverse project from the list. There is a field to indicate where the repository will be created (/Users/ceford/git/j4xtutorials-com-hellouniverse) - select the adjacent Create Repository button. Finally select the Finish button.
You will notice that some new decorations have appeared alongside the items in the Project Explorer view:
- The > marker indicates there is content that has changed but not been committed to the repository.
- The ? marker indicates this item has not been added to the list of items to be tracked.

You are now set up for version control. Right click on the project and see what the Team menu looks like. Much too much to cover here!
Finally
Ready to start working on your own code?