users
Description
The Users list is used to find, add, and edit users.
How to access
Home Dashboard → Site → Users
To add a User:
- click the New toolbar button
To edit a User:
- select a Name from the list
Screenshot
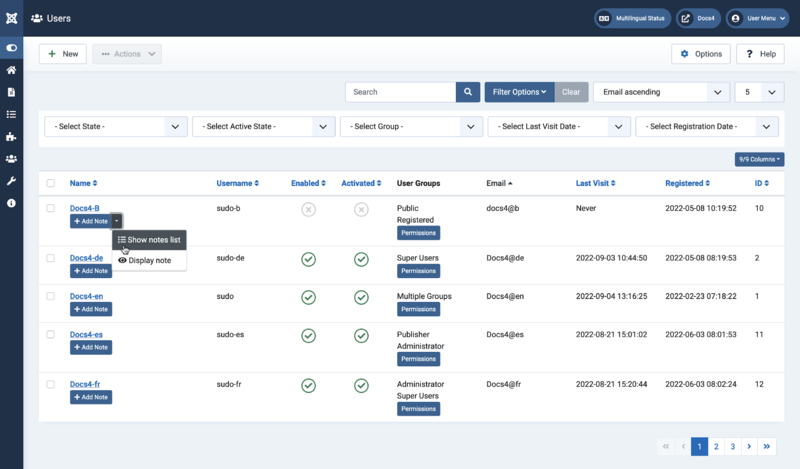
Column Headers
- Checkbox. Check this box to select users. To select all users, check the box in the column heading. After boxes are checked the toolbar button 'Actions' get active.
- Name. The full name of the user.
- Add a Note. Create a Note for the user.
- Show notes list. Show the User Notes for the user as a list.
- Display note. Show the User Notes for the user in a window and stays in the current screen.
- Add a Note. Create a Note for the user.
- Username. The name the user will log in as.
- Enabled. Whether or not the user is enabled.
- Activated. Whether or not the user is activated. Normally when a user registers from the Frontend, some type of activation is required. This is controlled by the 'New User Account Activation' parameter in the Users: Options.
- User Groups. The list of groups that the user belongs to. Note that a user may belong to more than one group.
- Email. The email address from the user is displayed here.
- Last visit. Here you can see the date on which the user last logged in.
- Registered. The date the user was registered.
- ID. A unique identification number for this user, you cannot change this number.
List Filters
Search bar. Near the top of the page you will see the search bar shown in the Screenshot above.
- Search by Text. Enter part of the search term and click the Search icon. Hover to see a Tooltip indicating which fields will be searched.To 'Search by ID' enter "id:x", where "x" is the ID number (for example, "id:19").
- Filter Options. Click to display the additional filters.
- Clear. Click to clear the Filter field and restore the list to its unfiltered state.
- Ordering. Shows the current list ordering field. 2 ways to change
the order:
- Select from the dropdown list. Ordering may be in ascending or descending order.
- Click a column heading. The column heading toggles between ascending and descending order.
- Number to Display. Shows the number of users in a list. Select from the dropdown list to change the number displayed.The default for a site is '20' but this may be changed in the Global Configuration.
Filter Options
Near the top of the page you will see the filter bar shown in the Screenshot above.
- Select State. Select from Enabled / Disabled.
- Select Active State. Select from Activated / Unactivated.
- Select Group. Select from the list box to list only users who are members of that group.
- Select Last Vist Date. Select from a list to show only users who visited in a selected time frame.
- Select Registration Date. Select from a list to show only users who registered in a selected time frame.
Pagination
Page Controls. When the number of articles is more than one page, you will see a page control bar near the bottom of the page shown in the Screenshot above. The current page number being viewed has a dark colour background.
- Start. Click to go to the first page.
- Prev. Click to go to the previous page.
- Page numbers. Click to go to the desired page.
- Next. Click to go to the next page.
- End. Click to go to the last page.
Toolbar
At the top of the page you will see the toolbar shown in the Screenshot above.
- New. Opens the editing screen to create a new user.
- Actions. Reveals a list of actions for selected users. Check one
or more users checkboxes to activate the list.
- Activate. Activates multiple users. Select all the users required using their checkboxes then click this button. An email will be sent to the user notifying that their account has been activated
- Block. Blocks one or more users. Select the users to be blocked using their checkboxes then click this button.
- Unblock. Unblocks one or more users. Select the users to be unblocked using their checkboxes then click this button.
- Batch. Batch processes the selected users.
- Delete. Deletes the selected users.
- Options. Opens Users: Options.
- Help. Opens this help screen.
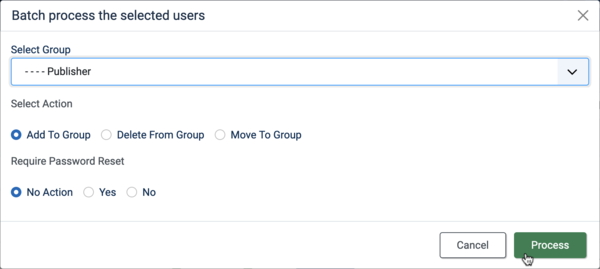
Batch Process
The Batch Process allows a change in settings for a group of selected users.
How to Batch Process a group of users:
- Select one or more users on the list by checking the desired checkboxes.
- Click the Batch Toolbar button.
- Set one or more of the following values:
- To change the User Group, select the desired new user group from the Select Group list box.
- Choose to do the desired action.
- Add To Group
- Delete From Group
- Move To Group
- Decide if a Password Reset is wanted.
- When all of the settings are entered, click on Process to perform the changes. A message "Batch process completed successfully." will show.
Quick Tips
- Click on the name of a user to edit the user's properties.
- Click on the icon in the Enabled column to toggle between Enabled and Disabled status.
- To understand user and group permissions, read:

Related information
- Home Dashboard: Access to many default Joomla functions.
| Related Help Screens | Description |
| Users: Options | User Options configuration allows setting of parameters used globally for all users. Control the use of Captcha, registration allowed and type of registration, default user group new users, reset password or username counter, and new user registration email notice to administration. |
| Users | The Users list is used to find, add, and edit users. |
| Users: Viewing Access Levels | In this screen you have the ability to look at a list of your Access Levels and sort them in different ways. You can also edit and create Access Levels. |
| Users: Edit Viewing Access Level | Access levels control which users can view which objects on your site. Objects include menu items, modules, categories, and component items (articles, contacts, and so on). Each object in the site is assigned to one access level. User groups are also assigned to each access level.If a user is a member of a group that in turn has permission for an access level, then that user can view all objects assigned to that access level. It is important to understand that user groups can be arranged in a parent-child hierarchy. If so, then a child group has access to all access levels that the parent group has access to. So you don't need to assign a child group access to levels that its parent group already has access to. |
| Permissions for Group | The Debug Permissions report maps out the exact permissions for any given user group across all assets on your Joomla! installation. |
| Permissions for User | The Debug Permissions report allows you to map out the exact permissions for any given user across all extensions on your Joomla installation. |
| Users: Groups | User Groups control what actions a user may take on the site and which objects a user can view. This screen allows you to create, view, edit, and delete User Groups. |
| Users: New or Edit Group | User groups play a central role in what a user can do and see on the site. Creating user groups is normally the first step in setting up the security system for your site. |
| Mass Mail Users | The Mass Mail screen allows Users who are members of the "Super Administrator" group to send an email message to registered users for the site. Users can be selected based on groups. |
| Users: Edit Profile | In this screen, you have the ability to create a new user (if you clicked on the 'New' button in the User Manager), or edit an existing user (if you selected a user and clicked on the 'Edit' button in the User Manager, or clicked on the name of a user). |
| User Notes: Categories | This screen allows you to look at a list of your user note categories and sort them in different ways. You can also edit and create user note categories and access levels. |
| User Notes: New or Edit Category | This is where you can add a new Category or edit an existing Category. Categories are used to organize the User Notes. Categories allow you to display related User notes together on a page and to filter User Notes in the User Notes Manager. All User Notes are assigned either to a Category that you create or to the special Category called 'Uncategorized'. |
| User Notes | User notes are pieces of information which can be assigned to registered users on your Joomla! site. These notes can contain for example comments about 'offending' or 'difficult' users etc. |
| User Notes:New or Edit | In this screen you can create an user note or edit an user note. The 'editor' will be the chosen 'editor' for the user editing the note. Examples: TinyMCE - JCE - Codemirror. |
| Menu Item: Password Reset | Used to create a form which allows a user to reset their password with an email sent to the user's email associated with the account. |
| Menu Item: User Profile | Used to create a form which allows a user to edit their profile settings. |
| Menu Item: Edit User Profile | Used to create a form which allows a user to edit their profile settings. |
| Menu Item: Registration Form | Used to create a default User Registration form for user registration. Default form contains basic information: Name, Username, Password, and Email Address. |
| Menu Item: Username Reminder Request | Used to create a form which allows a user to request an e-mail with their username. |