components-weblinks-links
Description
The Weblinks component allows you to manage links to other web sites and organize them into categories to display on your site. Optionally you may allow visitors to add new links. This component is not included in Joomla 4. It must be obtained from the download site (https://downloads.joomla.org/extensions/weblinks) and installed as for any other extension.
How to Access
Select Components → Web Links → Links from the Administrator menu.
Screenshot
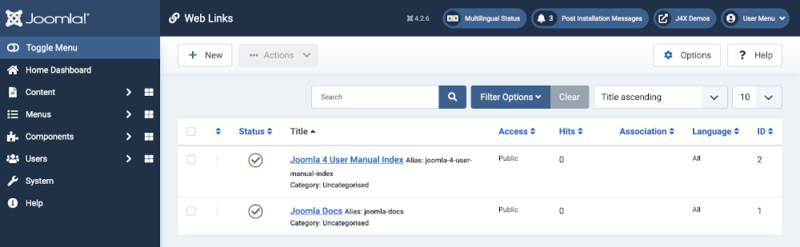
List Filters
Above the table is a Search Bar for basic searching and sorting:
- Search: Enter any part of a link text or ID:XX where xx is a number to search for a specific link.
- Sort Table by: (preset to Title ascending) to choose a sorting method.
- A number (preset to the site default list limit set in Global Configuration) to choose an alternative number of links to display.
The column headings also show the current ordering method, set to Title by default. Click a heading to order by that heading. Click again to toggle the direction from ascending to descending.
Filter Options
Select the Filter Options button to reveal more filtering options. More than one filter may be set and only items that meet all of the filter conditions will appear in the list.
- Select Status. Select from Trashed / Unpublished / Published / Archived / All.
- Select Category. Select from the list of available categories.
- Select Access. Select from the list of available viewing access levels.
- Select Language. Select from the list of available languages, if the site manages more than 1 language.
Filter by Tag Type. Select the Tag Type from the drop-down list box
of available Tag Types. Available tags are components in which tags are
defined. 
- Select Max Levels. Select from the list of available levels.
Automatic Pagination
Page Controls. When the number of items is more than one page, you will see a page control bar near the bottom of the page shown in the Screenshot above. The current page number being viewed has a dark colour background.
- Start. Click to go to the first page.
- Prev. Click to go to the previous page.
- Page numbers. Click to go to the desired page.
- Next. Click to go to the next page.
- End. Click to go to the last page.
Toolbar
The functions are:
- New. Opens the editing screen to create a new web link.
- Actions. dropdown list activated when one or more list items are
selected.
- Publish. Makes the selected web link available to visitors to your website.
- Unpublish. Makes the selected web links unavailable to visitors to your website.
- Archive. Changes the status of the selected web links to indicate that they are archived. Archived web links can be moved back to the published or unpublished state by selecting 'Archived' in the 'Select Status' filter and changing the status of the web links.
- Check-In. Checks-in the selected web links. Works with one or multiple web links selected.
- Trash. Changes the status of the selected web links to indicate that they are trashed.Trashed web links can still be recovered by selecting 'Trashed' in the 'Select Status' filter and changing the status of the articles to Published or Unpublished as preferred.To permanently delete trashed web links, select 'Trashed' in the 'Select Status' filter, select the web links to be permanently deleted, then click the 'Empty Trash' toolbar icon.
- Batch. Batch processes the selected web links. Works with one or multiple items selected.
- Help. Opens this help screen.
- Options. Opens the Options window where settings such as default parameters can be edited.
Quick Tips
- You need to add at least one Category for Web Links before you can add your first Web Link. Categories are added using the Web Link Category Manager.
Related Information
- To add or edit Web Links: Web Link Manager - New/Edit.
- To work with Web Links Categories: Web Link Category Manager.
- Web Links-related menu items: List All Web Link Categories, List Web Links in a Category, Submit a Web Link.
- Weblinks module: Weblinks module.