submenus
Menu Basics
In Joomla, three elements contribute to the display of a menu to the user:
- A Menu is a container for menu items.
- A Menu Item is a link to a site page or external page.
- A Menu Module provides a method to allocate the menu to a position on the page and to control aspects of the menu or page appearance or behaviour.
Simple menus consist of lists of links. Sometimes, members of a list have parent-child relationships displayed as indented children or drop-down lists. Parent-child relationships can be nested to any level. However, nesting beyond two levels can make lists unattractive and awkward to use.
There are occasions when you may wish to show the children of a parent menu as a separate submenu. One common use case is to show a submenu to the left of a page, the page content in the centre, and a table of contents of the page to the right. This tutorial explains how to do it.
Example Data
Suppose you have a series of articles on animals. It could be family pets, a veterinarian information sheet or a zoo. The following is a short example structure for demonstration purposes:
Animals
    Cats
        Burmese
        Russian Blue
    Dogs
        Collies
        Pomeranians
The lists could be quite long so you may wish to display just a list of cat breeds on pages about cats and just a list of dog breeds on pages about dogs. The following screenshot shows the target layout the user would like to achieve:

In this example, when the user selects the Animals menu item the Animals page is loaded and the Cats menu module disappears (no Dogs module either). Select the Cats menu item and the Cats menu module appears alongside the Cats page. Select the Burmese menu item and the Burmese page appears. Select the Dogs menu item and the Cats menu module is replaced by a Dogs menu module alongside the Dogs page.
To try this tutorial for yourself you will need to create some articles, a menu with menu items and three menu modules.
Create Articles
If you are super-efficient you can create an article and then create a menu item from the article. For that you would need to first create a new menu and take some extra steps during article creation. So best keep it simple at first and start with your new articles:
- Select Content → Articles → + from the Administrator menu.
Or select the
Newbutton from the Articles list. - Fill out the form as you would for any article.
- Select the
Save & Newbutton from theSave & Closeto move on to the next new article.
The example data shown above requires seven articles.
Create a New Menu
From the Administrator menu:
- Select Menus → Manage.
- In the Menus list page select the
Newbutton to create a new menu. - In the Menus: Add form give the menu a title: Animals and a unique name: animals.
- In some cases you may need to remind yourself what this menu is for. So fill out the description field.
- Save or Save & Close.

Create Menu Items
There are seven menu items to create.
Animals Menu Item
The new menu items will be located in the Animals menu.
- Select Menus → Animals → + from the Administrator menu.
- Fill out the Menu: Edit Item form.
- Title: Animals
- Menu Item Type: Single Article
- Select Article: Animals - this is the parent article used to introduce the series on Animals
- Menu: Animals
- Parent: - No Parent - this is the menu root
- Select Save & New from the
Save & Closedrop-down list.
Cats Menu Item
This is very much a repeat of the Animals menu item. Except:
- Title should be Cats.
- The article selected in the Select Article field should be
Cats. - The Parent Item should be set to
Animals.
Burmese Menu Item
Repeat again. Except:
- Title should be Burmese.
- The article selected in the Select Article field should be
Burmese. - The Parent Item should be set to
Cats.
More Menu Items
Carry on until you have seven menu items, one for each article.
Menu Item List
When you have created all your menu items check that they have the correct parent-child relationships and they are in the correct order. You can sort on the Ordering column (the second column) and use the grab handles (vertical ellipsis) to drag items into the correct order. If any item has a wrong parent just select the item title and change the parent in the Menus: Edit Item form.

Menu Modules
At this stage you have a menu but it does not have a module to be assigned to a position on the page. You could use the whole menu as a standard menu or drop-down menu. However, the point of this tutorial is to demonstrate how to create submenus. For that you need three different modules:
- An Animals module for a submenu with menu items on Animals, Cats and Dogs.
- A Cats module for a submenu with menu items on cat breeds.
- A Dogs module for a submenu with menu items on dog breeds.
Animals Submenu Module
From the Administrator menu:
- Select Content → Site Modules → + or select
Newfrom the Modules (Site) list. - Select the Menu module.
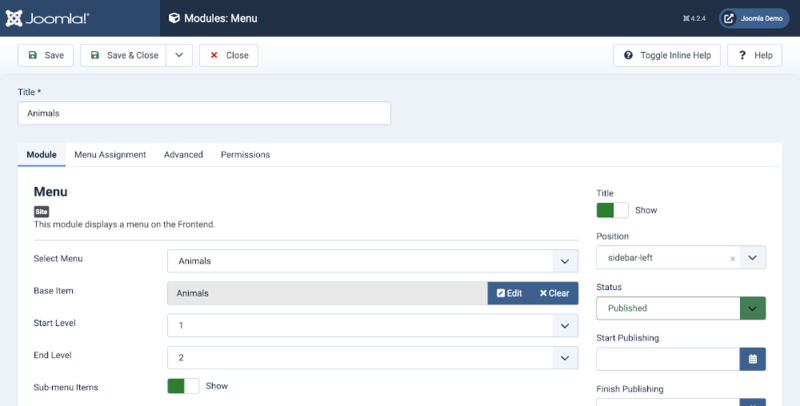
- In the Modules: Menu edit form enter the following data:
- Title: Animals
- Select Menu: Animals
- Base Item: Animals (this is the parent menu item)
- Start Level: 1
- End Level: 2 (this limits the items to the menu items on Cats and Dogs)
- Position: sidebar-left (or wherever suits you)
Menu Assignment
Submenus are normally shown only on pages where they are relevant, in this case on only three pages. From the Menu Assignment tab:
- Set the Module Assignment field to
Only on the pages selected. That reveals a hierarchical list of all items in all menus. - Check the boxes against Animals, Cats and Dogs.
- Check the boxes against the breeds of cats and dogs. Otherwise the Animals submenu will disappear on pages about breeds.
- Make sure no other boxes are checked.
- Save & Close

Cats Submenu Module
This is very similar:
- Select Content → Site Modules → + or select
Newfrom the Modules (Site) list. - Select the Menu module.
- In the Modules: Menu edit form enter the following data:
- Title: Cats
- Select Menu: Animals
- Base Item: Cats (this is the parent menu item)
- Start Level: 3
- End Level: All
- Position: sidebar-left (or wherever suits you)
Menu Assignment
From the Menu Assignment
- Set the Module Assignment field to
Only on the pages selected. That reveals a hierarchical list of all items in all menus. - Check the boxes against Cats, Burmese and Russian Blue. Make sure no other boxes are checked.
- Save & Close
Dogs Submenu Module
More of the same ...
Menu Item Alias
So far so good! But there is no link to the Animals page from the Main Menu, or any of the other site menus. The easy way to fix this is with a Menu Item Alias. For this example, an entry is made in the menu at the top of the page, entitled Main Menu Blog. From the Administrator menu:
- Select Menus → Main Menu Blog (or whichever is your preferred site menu).
- Select the
Newbutton from the Toolbar. - Fill out the Menus: Edit Item form
- Title: Animals
- Alias: creatures - there is already a menu item named Animals so you must use a different alias.
- Menu Item Type: Menu Item Alias
- Menu Item: Animals - selected from the list of existing menu items.

- Save
- Ordering - after save the order can be changed. In this example it is placed first.
Check the Result
View the pages in your site. In this example, most pages will not show the submenus in the left side position. The Animals link in the top menu will open the animals page from which it is possible to navigate to the Cats or Dogs pages:
